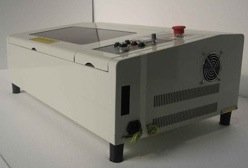
 For my birthday last year I decided to get a new toy for my workshop – a laser cutter. I spent a fair amount of time researching various options and eventually decided on a 40 Watt CO2 laser. I purchased an inexpensive Chinese laser cutter from Full Spectrum Engineering. FSE imports them and then sells them from their US offices, which means you get to deal with a local US-based company. For just under $2K at the time you got a 40 Watt CO2 laser with approximately 12″ x 11″ cutting area. The specs have only improved since then. Mine also came with an upgraded controller card that allows the laser to be driven from Mach3 or other CNC control software.
My machine needed a bit of TLC after unpacking. The mirrors and laser lenses needed alignment, which I fixed using thermal imprint paper and a very low power setting to figure out where the laser was pointing at each point along the path. At times the answer was — pointed directly at my hands. Good times. This is pretty typical of these imported machines, but the good news is it’s quite straightforward to get them set up and working well.
Once I was done and got it running, I tried the included software and was horrified by what I saw. The circle I drew to test cut out of paper had jagged edges looking like it was at about 75 dpi resolution, which was much worse than the stated 1000dpi. It turns out the included software (NewlyDraw) is complete junk, and the machine is capable of much better results.
By switching out the controller card with the upgraded Mach3-compatible card and driving it with Mach3 I was able to get it running very accurately and smoothly. But there wasn’t a great solution for creating GCode files from CorelDraw or other vector art, so it was tedious to prepare cutting jobs for the laser.I ended up writing software to make this pretty seamless. My software takes an SVG file and converts it to GCode usable by Mach3. When I used it to test the same circles picture I did before the results were stunning. Everything was smooth and the steppers even sounded happier and less jerky being driven by Mach3. So you can edit directly in CorelDraw and then save as SVG and the LaserCAM software spits out GCode.
The pictures below show the software running and then the final results cut from 3mm white acrylic. The file as I edit it in CorelDraw is upright, but it shows up flipped vertically in the LaserCAM software because of how my Y-Axis is mapped on my laser cutter.

 The software is available on my GitHub athttps://github.com/yergacheffe/lasercamand could be adapted for other brands of laser cutters. It’s still a far cry from the nice printer driver interface that an Epilog laser cutter provides, but at 1/10th the cost this is a pretty good alternative for the hobbyist.


