
When I was younger I was a big fan of Peter Sellers in The Pink Panther as Chief Inspector Clouseau. One of my favorite running gags was his butler, Cato, who in addition to answering the phone and preparing meals was also responsible for attacking Clouseau without warning. These attacks were designed to keep Clouseau vigilant and in fighting shape, and there were many epic battles between them. Several decades later I’ve come to realize that I have my own personal Cato in the form of my cat. Our cat is sweet and loving with everyone else in the family, but with me her favorite thing to do is attack me when I least expect it. She will literally wait by the door for hours and when I come home she jumps at me with her back arched waiting to be chased around the house. Like Clouseau, I am responsible for my attacker’s behavior – having trained her to attack me with our games.
A Heartless Killing Machine
As a result, when I think of the cat I don’t think of a cuddly little pet but rather a vicious killing machine. My wife took a picture of her that captures the cold depths of the cat’s evil soul and I really like it. So I decided to make a big version of it to hang on the wall using my CNC router and some custom software I wrote.
The idea was to do a halftone-style picture by cutting circles of varying size in a panel of wood that would show through a black background. I modified my Paper Pixels software to take a picture of the cat and sample the average brightness in a grid pattern and then turn this into an array of circles. Large circles for dark areas (which thus show more of the black background) and small circles for light areas (which thus show the light birch wood I was planning to use). The picture on the left below is the original image I started with and the one on the right it the output after my software processed it.


We Love Constraints
My CNC router has a table size of 24” x 16” and I wanted the resulting picture to be larger than that. I was going for 3 feet square, so I chopped the picture up into 6s panels of different sizes that I would assemble to make the finished picture. I’ve spoken many times about the fact that constraints like these can be used to improve the result. So rather than try to hide the fact that I cut the image up I accented it by splitting the panels up with space between them. I used 1/4” thick birch plywood sheets and finished them with several coats of amber Shellac to give a nice warm color. Then I cut each panel out with the router, after producing toolpaths with CAM software. Some of the holes ended up with ragged edges depending on how worn the tool was but some light sanding fixed things up quickly.


Once all 6 panels were cut, I sprayed the back with tacky adhesive from the local art supply store and glued thick black posterboard to the back. I mounted the panels to the wall right above the bed where the cat sleeps. The result is a nice combination of a geometric/abstract form with a somewhat photographic effect the further away you get from it.

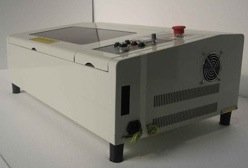 For my birthday last year I decided to get a new toy for my workshop – a laser cutter. I spent a fair amount of time researching various options and eventually decided on a 40 Watt CO2 laser. I purchased an inexpensive Chinese laser cutter from Full Spectrum Engineering. FSE imports them and then sells them from their US offices, which means you get to deal with a local US-based company. For just under $2K at the time you got a 40 Watt CO2 laser with approximately 12″ x 11″ cutting area. The specs have only improved since then. Mine also came with an upgraded controller card that allows the laser to be driven from Mach3 or other CNC control software.
 The software is available on my GitHub at