25
Aug 09

CNC T-Shirts

T-Shirts I have many random memories from my childhood – one of them is the time my mom and I tie-dyed some T-Shirts together.

The sentence that you just read, while being completely true, is also potentially a shining jewel of disinformation. Having read it you may have imagined me and my hippie mom barefooted and doing our tie-dying, stopping only to flip over the Janis Joplin record that was playing. This couldn’t be farther from the truth.

I grew up in Orange County, California – known for growing produce and conservative presidents. My parents have a framed photograph of Ronald Reagan hanging on the wall. I was sporting a buzz-cut given to me by my father, who had done a stint as a barber a few decades earlier and hadn’t sharpened his scissors since. So when I say my mom and I were tie-dying, it was not because we were turning on, tuning in and dropping out. It was more likely that the Ladies Home Journal had run an article on it. LSD had long-since jumped the shark by the time tie-dying became commonplace in my hometown.

But it was a fun time and I remember it to this day. I got to make some new memories with my family this weekend as we made our own screen-printed T-Shirts. Of course, I refuse to use anything so crude as hand-twisted fabric and rubber-bands. Around here we like our folk-art at 1200dpi precision or better and that’s what we got.

Making A Stencil

There are a lot of great Instructables on screen-printing, so I won’t go into details on the process beyond saying it’s essentially applying ink to a T-Shirt through a stencil. So the core problem is creating the stencil you want for your pattern.

My plan was to use my newly-acquired CraftRobo to cut a stencil out of vinyl. It’s the home equivalent of the CNC vinyl cutter I’ve used at TechShop but at a smaller scale. The CraftRobo needs vector outlines to describe the shape to cut, which was going to be generated from a photograph.

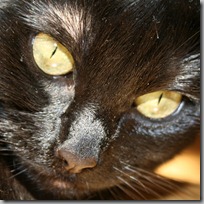
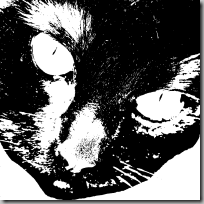
I started out with a picture of our cat and converted it to a monochrome image using a straight threshold filter in my image editor. The logic simply says that any pixel with a brightness greater than 50% is white and the other pixels are black. I adjusted the brightness and contrast of the source image first so I would get the best results after thresholding – it was particularly important to get the eyes right with lots of white with slivers of black. I then did some editing of the resulting black-and-white image to clean up the edges and get rid of random detail.

IMG_0398 PFace

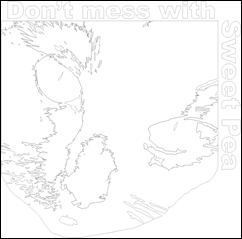
Next I imported the bitmap into CorelDraw and used the outline trace to generate a vector outline version of the bitmap. Because of all the tiny little white dots in the image, I ended up with a fairly complex set of vectors. So I spent a bit of time deleting these tiny little shapes which are essentially unnecessary detail. This speeds up the cut as there’s much less work for the cutter to do and less time with tweezers weeding out tiny pieces of vinyl. Finally I added some text and had completed vector art ready to cut.

Dont Mess With Sweet Pea

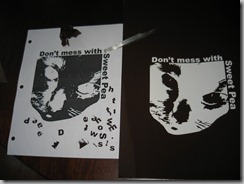
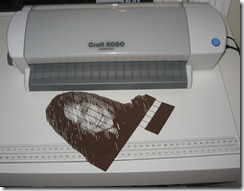
Once the stencil was cut it was time to weed out the pieces of vinyl that weren’t part of the stencil. I did this once and removed the completely wrong pieces. In my defense it’s a bit confusing, since you want to throw away the pieces where you want ink to appear so you end up with a reverse image in the stencil. I printed out the image as a cheat sheet and spent about 5 minutes pulling off pieces with a pair of tweezers and got a nice stencil.

IMG_0072

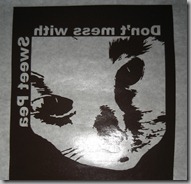
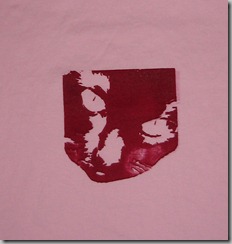
Then I applied the stencil to some transfer paper and it was ready to stick on my printing screen. The image is flipped horizontally at this point because the sticky part of the vinyl sticker is facing up.

IMG_0081

Printing

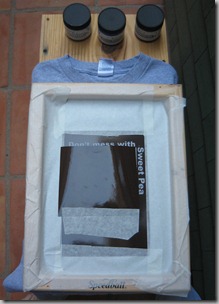
If I had more time I would have made my own printing screen, but instead I bought one at the local art supply store for about 5 times more than the couple bucks it should cost. The company that makes it decided to call themselves “Speedball” which makes me think they don’t do much international business – not exactly a name that guarantees a hassle-free trip through customs. I also picked up a couple colors of fabric ink. I wanted to use different colors for the text and the image, so you can see I’ve masked off the image separately as I’m getting ready to apply the ink. This was a total hassle and for subsequent prints I’m just making separate stencils for the different colors.

IMG_0082

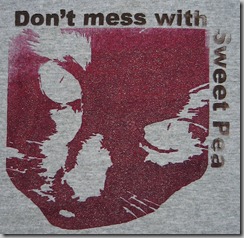
The first print came out OK, but the ink was pretty uneven on the text due to me not being aggressive enough with the squeegee. Also some ink bled through on the side due to some poor making tape around the stencil. But I knew the first one would be rough, so I made my shirt the guinea pig so we’d have the kinks worked out before we did the others.

IMG_0083 

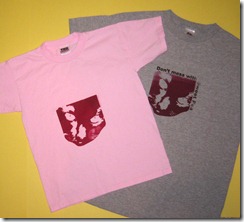
We were flying blind a bit on colors, not really knowing how they would look on the shirts. But by the time we did my daughter’s shirt the combination of good technique and great color combination produced an excellent result. We’ll add some text in a different color later – I’m assuming registration should be simple enough but we’ll see.

IMG_0092

There’s a ton of places that will print custom T-Shirts so there’s plenty of competition and as a result prices are pretty low. So this DIY project isn’t much of a money-saver, but it was a lot of fun and at least now I can brag about my CNC T-Shirt.
21
Aug 09

Deadly Robotic Razorblades

IMG_0070

Names and branding matter. My instincts tell me to never drink something called Calpis, so that name is a pretty big hurdle to get over. Having said that, if it tasted really good I’m certain I could get past the problematic moniker.

If you had told me last month how excited I would be about a product with the word “craft” in the name I’d have said you were insane. But a few days ago my brand new CraftRobo arrived in the mail and it’s pretty much the coolest thing I’ve acquired in a long time. Fortunately it’s got “robo” right there immediately after “craft” – the spoonful of sugar to help the medicine go down. It may be a crafty automated 2D paper cutter – but really it’s a razor controlled by a robot and that’s pretty cool no matter what you call it.

Through twitter I stumbled onto some video by Bre Pettis and Jeff Rutzky at http://www.craftrobostore.com/ of the Craft Robo in action. I’ve been using an Epilog laser cutter to cut cardstock and a CNC Vinyl Cutter to make stickers at TechShop, and the Craft Robo looked like it could handle these materials as well. I found one for around $200 new on eBay, so I clearly wasn’t expecting it do anything as intricate as I was doing on machines that cost 10 to 100 times as much. But for the price it seemed like a no-brainer to get and try out.

I started out cutting some simple shapes from cardstock and vinyl just to test it out and I was impressed by how fast it was. It cut out text from vinyl as fast as the CNC cutter I had used before and the resolution was indistinguishable as well.

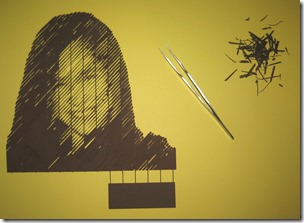
The tests were so successful that I decided to throw down the gauntlet. I tried cutting one of the more challenging shapes I’ve done on the laser cutter – a photograph cut from cardstock. I literally opened the exact same CorelDraw file I had previously cut on the Epilog and sent it to the Craft Robo. The first thing I noticed is that it took about the same time to cut on both – about 5 minutes. When the job was done cutting I was blown away by how faithfully the Craft Robo had reproduced the photograph. I wasn’t able to find any resolution claims in the specs posted online for the Craft Robo, but there are sections of the image where the cuts are only .02 inches wide and it had no trouble resolving these lines.

The biggest issue was that most of the pieces didn’t completely cut through. The entire job consists of thin strips to be cut out and since the Craft Robo uses a drag-cutting blade that has to rotate to cut it’s not great at cutting sharp acute-angled corners. So what I ended up with was a bunch of slivers that I had to manually weed out using tweezers, whereas on the laser cutter all the pieces except a couple fell out. But for $200 and about 20 minutes of weeding I got a result that is pretty comparable to the laser cut version.

IMG_0060

The other major limitation of the Craft Robo is the size of material it can handle, which is limited to about 7” x 10”. I’ve out 5 foot long stickers at TechShop to stick on my walls, which I couldn’t do with the Robo. But these are totally reasonable constraints given the impressive price point.

This weekend I’ll be working on some software to do some more creative halftoning and color separation, which should allow colored photographs to be reproduced with multiple layers of cut cardstock. I haven’t come close to finding the limits of this machine yet and can’t recommend it highly enough.


14
Aug 09

Burning Rubber

Samples

There’s a fine line between being a Maker and a Crafter (if indeed there really is any line at all). Personally I got into this hobby with the firm intention to stay on the side of the line that is occupied by computer-controlled lasers and Tesla coils, but lately have found myself spending an inordinate amount of time playing with construction paper. I feel like somehow I should be more enlightened and not care about such trivialities, but the fact remains that when one sets out to find their inner Edison it’s a bit of a shock to discover that really it’s Martha Stewart in there. I take some comfort in the fact that I’m not the only one who struggles with this. Let’s face it, the only reason to crochet a hand grenade is to prevent your idle hands from turning out a tea cozy.

I gave up toeing the line and jumped right over it with this weekend’s project – rubber stamps. My kid said something about wanting some new stamps and the part of me that is constantly looking for any excuse to pop over to TechShop for a few hours sprang into action. I knew that it was possible to etch custom rubber stamps with a laser cutter, but not much more than that. Less than 24 hours later I’d made a bunch of mistakes but ended up with some pretty good stamps.

Raw Materials

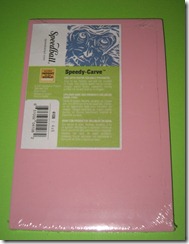
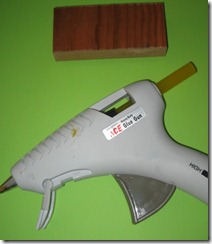
I had a goal and no plan, but I didn’t let that prevent me from getting started. I wandered around a local art supply store looking for things I could etch with a laser. It turns out they actually sell plain rubber sheets for hand-engraving and through some random bit of luck I walked right up to them in the store. They are exactly the color and texture of newborn hamster – pink and squishy and somehow unsettling. Then all I needed was some wood to use as a handle for the stamp. I had some scraps in the garage that I cut down to size. That plus some hot glue and I was ready to go.

RawMaterials Gun

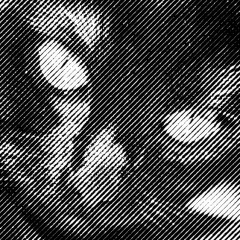
For artwork I grabbed some pictures of our cat and some Super Mario characters. Stamping with ink has the same constraint as some of my previous art projects – there is no way to modulate the intensity of the ink so you need to modulate the density of placement to get gradations of color. I should rename this to the halftone blog, since I end up using halftoning techniques for everything I do. In CorelPaint I converted the images to monochrome and used a variety of halftone methods to see what worked best. In the images below the Shine Sprite uses a dot halftone whereas the cat is using a 45-degree line halftone.

shine pea_lines

Frickin’ Laser Beams

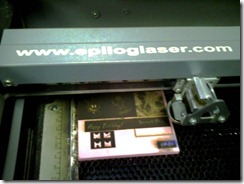
Armed with something to burn and some suitable images I headed over bright and early (the only way to get time on a laser on short notice is to get there at 9AM) to use the 45 watt Epilog laser cutter. Inking paper with a stamp means we want to place ink where the images are dark. This is the reverse of how the laser usually works, which is to burn the material where the image is dark. For our rubber stamps we want to burn away the bits that shouldn’t pick up ink which is the white parts of the image.

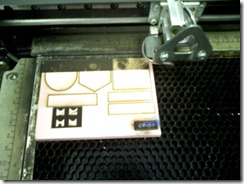
The Epilog print driver has a specific setting in the Advanced tab called “Stamp Mode” which reverses this logic so white areas turn the laser on rather than black. This was just what I needed so I picked that and then went to start my etching/cutting job. Since my piece of rubber material was fairly large (around 100mm x 75mm) my job consisted of several stamps I would etch into and cut from the rubber. I added hairline vector outlines around the raster images which would cut partially through the rubber making it easy to separate the stamps.

But when I ran my job it only etched one of the stamp images and skipped all the others. Additionally it didn’t do any of the vector cutting at all. I’ve had issues like this before – setting the wrong line weight or fill/clipping options can cause a part of your document to get skipped. After wasting half an hour I was completely stumped. In desperation I turned off “Stamp Mode” in the driver and voila everything started working again. So rather than continue reverse-engineering the inscrutable logic of Stamp Mode, I just inverted my colors manually and started my job up. The vectors cut and the images etched and all was well.

Vector Cutting2

The job was about 98% done and I was admiring how nice the text stamps (Happy Birthday) were coming out when it occurred to me that there’s at least one other thing that Stamp Mode must be doing. Clearly it is also flipping the images horizontally, since what you get on the paper is a mirror image of what you see on the bottom of the stamp. So my text stamps were only useful for stamping birthday wishes on the front of cars so they could be read from another vehicle’s rear-view mirror. Another hard-won piece of knowledge gained.

The Verdict

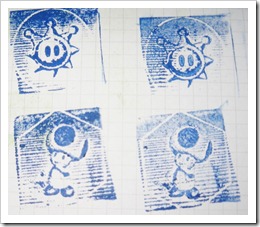
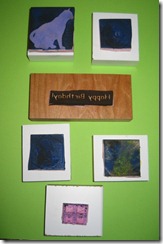
FinishedStampsI had other stamps I wanted to etch, but at this point nearly 2 hours had gone by and as intoxicating as the fumes of burning rubber were it was time to call it a day. I cut the stamps out and affixed them to the wood blocks and did a few test runs to see how they came out.

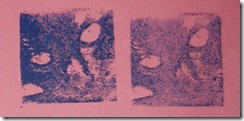
CatFace-Stamp All told I’m pretty satisfied with the results. There linear halftones have the lines a bit too close together so the lines aren’t as distinct. In the future I’ll probably go with fewer lines-per-inch for the halftone. Additionally, I only ended up etching out about 1/16th of an inch or so which isn’t enough to get a really clean stamp. I had to run the laser fairly slow (~15% speed) to get that so next time I’ll probably do 2 passes to burn away a bit more material. You don’t want to go any slower than I did, because at slower speeds rather than etch deeper the rubber simply gets overly hot and starts to melt.

Although the next logical step in the progression is probably something like laser-cut doilies, I’m not sure what I’ll be doing next. I was inspired by the #awesomeaugust trend on Twitter, which is a challenge to finish 4 projects in the month of August. I made a list of projects either already partially started or band-new and I’ve got a few days of vacation, so we’ll see where inspiration strikes next.


PS: I mentioned the crocheted hand grenade guy earlier. You’ve got to check out his site at http://woowork.blogspot.com/ – everything he does is pure effin’ gold.