20
Jul 09

1-Axis Plotter

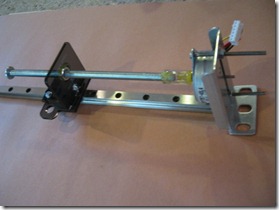
Following up on my flea market score earlier in the weekend I decided to assemble my treasures into something useful…or at least just into something period. By the end of Sunday night I was the proud owner of a 1-axis CNC plotter. It completely automates the process of drawing straight lines along a fixed axis :) .

The eventual goal is to build a plotter/CNC that is actually useful, but you’ve got to start somewhere.


Design

I decided to go with a lead-screw drive because it seemed simpler than a belt drive and I had most of the parts on hand. The first thing I needed to do was figure out a way to attach a bolt to the carriage on the slide that could push it along as the lead-screw turned. I also needed a way to hold a pen on the carriage.
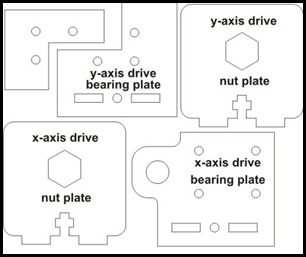
Corel Parts I had several sheets of 1/8” acrylic and access to a laser cutter at Techshop, so I drew up a set of parts in CorelDraw that would attach to the carriage and hold the captive nut and pen. I actually drew parts for both drive axes, but am only using the x-axis parts here. It was critical to line up the screw holes that attach the plate to the carriage, but all I had was my daughter’s plastic ruler from school to measure the dimensions. When I cut the parts I made sure to bring the slides with me and it turned out I was off by about 2mm on some of the holes so I had to re-do the cuts a few times.

I would have been totally lost on how to make a solid connection between the acrylic parts if I hadn’t read oomlout’s Instructable. I stole his templates for the connecting slots and it worked out brilliantly.

Fabrication & Assembly

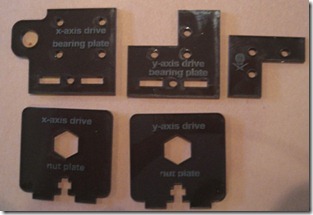
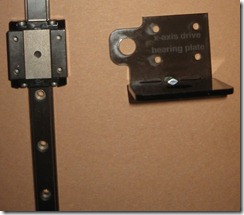
Below are the final acrylic pieces. It took about 3 minutes to cut them on a Epilog 45 watt cutter. The Epilog uses a print driver, so you essentially just “print” to it. A cool thing is you can combine cutting and etching in the same document – vector outlines will cut and bitmaps will do a raster scan etch. So I was able to label and cut the pieces with a single job. The picture on the right shows the 2 parts of the x-axis drive screwed together and ready to be attached to the carriage.

Cut_Acrylic_Pieces Assembled_Acrylic

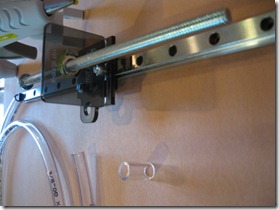
Finally I hot-glued the captive nut into the acrylic plate and threaded a long 1/4” bolt into it. The longest bolt I could find was 6” but the slide has almost double that in travel. I’ll get some threaded rod and cut it to size for the 2-axis version, but this was fine for testing. Then I attached the bolt to my stepper motor using a little bit of plastic tubing and hot glue.

CaptiveNut Final_Assembly

Testing

I wired the stepper up to an Arduino with one of the excellent Adafruit motor shields to drive it. The screw turned pretty easily, but I actually had no idea at all if the motor would have enough torque to make the thing work. The motor shield comes with a nice driver library, so it was only a few lines of code to get it working. Once fired up it worked well – the speed is about 1cm/s. I mounted the motor a bit high and my bolt isn’t quite straight which makes the spinning bolt a bit wobbly. If I fix those issues I can drive this at a higher speed.

For my first motorized project I’m declaring this a success. Riding this mechanism on top of a second axis movement and coordinating the steppers will be a bigger challenge, but now seems much more doable.
18
Jul 09

Pictures From Paper

One of my favorite toys at Techshop is the Epilog laser cutter. It can cut and etch at resolutions up to 1200dpi. It can cut through things like paper, cardboard, acrylic and thin wood as well as etching into those materials, metal and even food.

Lately I’ve been experimenting with creating pictures by cutting pieces out of colored card stock and stacking them up. The way to think about it is that each layer of paper gives you a single color – it’s like a 1-bit monochrome bitmap that’s either the color of the paper or transparent showing what’s behind it. Newspaper printers figured out ages ago how to deal with a similar set of constraints – a single ink color, but high resolution of ink placement – and approximate multiple shades of color using a technique called half-toning. Here’s how I adapted this technique for paper-cut images.

 halftone

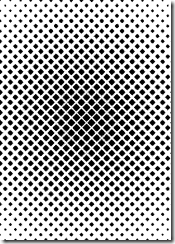
My first test was to see how I could approximate a gradient fill. I started by creating a jpeg image containing a simple black-to-white radial fill (left). Then in my paint program I converted the grayscale image to a monochrome black-and-white image. When you do this in CorelPaint it gives a variety of options on how to do the conversion. One of them is creating a half-tone image, which is what I used. I created a halftone using squares (dots are the ones you see in newspapers) at a 45 degree angle and a very low resolution of 7 lines per inch. The result is the picture on the right.

Now I needed to turn this image into vector outlines so the laser cutter can deal with it. I imported the bitmap into CorelDraw and used the bitmap tracing feature to trace it in line-art mode. Corel’s tracing is fairly flexible and can attempt to trace multi-colored images by creating vector shapes in different colors. Sometimes even if you feed it a simple picture, things like anti-aliasing artifacts can trick it into using a bunch of colors which I didn’t want. Using line art tracing settings gave me a shape containing about 1500 little vector polygons that approximated the half-tone bitmap. I gave the shape an empty fill and hairline outline which tells the laser cutter to perform a cut of the outline rather than a raster-scan etch. The result looks like the image below.

It turns out the hardest part of the project was getting time on the laser cutter. My schedule has been very busy and between travel and working evenings and weekends I’ve only had a few chances to get to Techshop recently. The two laser cutters are very popular so it was almost 2 weeks before I had a chance to try it out. I cut at 600dpi, 100% speed and medium-low power which gave good speed and minimal charring. They call it a cutter, but what it’s doing is burning the paper, so too high a power or too slow a speed will end up with visible burn marks on the paper. A fire in the machine is a possibility as well and before they let you use the cutter you have to take a safety class where they force you to deal with a fire, which is not nearly as exciting as it sounds but still awesome.

I cut it out of dark brown card stock and then placed it on top of a background of red construction paper . The result is a radial ramp from red to brown that looks pretty good. I could have made the squares a lot smaller, but wanted them to be fairly big and obvious. Also, the file took 10 minutes to cut as it is. With a lot more polygons it would have increased the cutting time significantly.

You’ll notice that in the middle the halftone squares got so close they ended up touching and it cut the entire middle out. I didn’t worry about it because this was going to be the background for a picture and the middle would end up being covered. The full finished picture was a picture of a tea drink my daughter likes which you can see below. The additional layers are glued on top of plastic and acrylic spacers to give the whole image depth and the upper layers actually cast shadows on the lower ones.


14
Jul 09

One Man’s Trash…

Electronics Flea Market

I’ve lived in Silicon Valley for over a decade but until this weekend have never attended the monthly Electronics Flea Market at De Anza College in Cupertino. The fact that it’s on a Saturday and starts at 5AM may have had something to do with it. But this Saturday I set my alarm and was on the road by 6:30 headed south on 280.

I rolled into the parking lot around 7AM and the place was packed. At first I felt a bit out of place — lots of the cars had big HAM antennas on them and most of the folks were walking around with badges indicating their callsigns. I found myself gravitating towards the booths selling nicely packaged goods. There were plenty of guys who looked like they just opened up their trunk and dumped all their electronic trash into the parking lot, but walking up to such a stall was a commitment. I wasn’t actually looking for anything, so picking through junk and discussing Morse code or sidebands or whatever with some wild-eyed graybeard was a bit much at this hour of the day.

About an hour later I came upon a guy who scrounged all sorts of precision mechanical parts from surplus scrap he bought. This guy’s stall was pure gold. He had a box of stepper motors and servos that must have had a hundred random parts in it. I’ve been to Halted and Weird Stuff and on a good day maybe they have 10 steppers and half of those would be some bullshit 50V monstrosity that you’d use to open locks on the Panama Canal or something. But here were so many 5V and 12V servos I literally got tired of looking through them. I picked up a few steppers and then saw something that literally made me stop dead in my tracks. There were about a dozen beautiful precision slides that were perfect for a 2D plotter project I’ve been wanting to do. They had amazing linear bearings and were Billy Dee Williams – smooth as hell and good looking too. I got 3 of them for $25, which was enough to build my plotter and about a 80% off what these things would cost new.

After that I began to channel my inner junk man and scrounged in all the piles of crap I could find. You come to a flea market like this to get great deals on random junk, not to save 20% on something you could buy in a store. As I browsed I realized something else. I’ve become my father.

Childhood Dreams

When I was a kid I’d always wake up early on Thursday and stare out the window. It was the most exciting day of the week — trash day. I’d wait until the garbage truck came and then would chase it down the street watching the trash men do their glorious work. I declared to anyone who would listen that when I grew up it was my intention — nay, my destiny — to be a garbage man. My parents got a kick out of it and would make me tell the story whenever we had guests over. The reaction was always the same…laughter at my childlike foolishness. What they didn’t know is that there was a kind of logic to my mania. My enthusiasm for the work all came down to one simple thing: I loved the hydraulic lift that emptied the big trash hopper into the back of the truck. If by same cruel twist of chance they had just emptied it before reaching our house I might have to go the full length of the block before seeing its exquisite mechanical ballet played out. But it was always worth it. Even then it was all about the machinery and technology for me.

My dad, on the other hand, was all about collecting crap. He would routinely come home with his pickup (a Chevy El Camino, an uncharacteristically stylish vehicle that he bought off someone who was both cooler and in desperate need of cash) full of stuff he picked up from the trash at work. My dad worked as a plumber for government housing in Long Beach, so basically he was bringing home stuff that people who lived on welfare found disgusting enough to throw out. Our garage was stuffed so full of junk that it had become legendary in our neighborhood. Kids from school would come over for tours of the garage.

My dad was the kind of guy who would stop in the middle of the street to pick up a screw or washer. You couldn’t really fault him as he grew up in the great depression and experienced true poverty. He was like an overweight balding Scarlet O’Hara who had vowed never to go without a 6 penny nail again, and thus would always pick up this junk which would get added to an empty coffee can or pill bottle. There was no organization or sorting, so the detritus would end up in a random vessel where it might find itself cohabitating with a section of garden hose, a rusty spring or some other treasure. My father was not a disorganized person, but the rate of incoming effluvia was so great that he simply couldn’t keep up with it. However, his inherent desire to categorize demanded that he label each can and box and this is how our garage became stacked to the rafters with containers labeled "To Be Processed."

In recent months I’ve become interested in making things…not software programs or other abstractions but real things that you can touch, feel and explain to the elderly. In so doing I’ve become more aware of the utility of things like washers and springs, and the rarity of things like gears and a good timing belt. The other day I came across an aluminum angle bracket in a junk drawer and my delight was as if I found $20 in the pocket of an old pair of pants. In fact, such treasures are legion once you start looking for them and they can accumulate rather quickly. So now I have in my office a cardboard box of random items…that are….you know….to be processed.

Something For Everyone

I came home with a decent haul and was as proud of myself for what I didn’t buy (LEDs…I caressed many of them but managed to not buy any more) as well as what I found:

  • The aforementioned bad-ass linear slides for $25 
  • A pair of nice 12V steppers for $5
  • A handful of aluminum sprockets for a buck
  • About a dozen nice bearings for 50 cents each
  • A nice set of mini tweezers, a mini screwdriver with 8 interchangable bits and 4 mini-clamps for around $5
  • 5 albums for my wife who collects vinyl, including The Monkees, ELO and Moody Blues. There were several folks selling albums for one or two bucks and one lunatic who wanted $8 for a Fleetwood Mack album.

I’ll definitely be back to collect more items to process in the near future.