There’s a fine line between being a Maker and a Crafter (if indeed there really is any line at all). Personally I got into this hobby with the firm intention to stay on the side of the line that is occupied by computer-controlled lasers and Tesla coils, but lately have found myself spending an inordinate amount of time playing with construction paper. I feel like somehow I should be more enlightened and not care about such trivialities, but the fact remains that when one sets out to find their inner Edison it’s a bit of a shock to discover that really it’s Martha Stewart in there. I take some comfort in the fact that I’m not the only one who struggles with this. Let’s face it, the only reason to crochet a hand grenade is to prevent your idle hands from turning out a tea cozy.
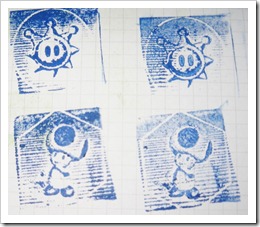
I gave up toeing the line and jumped right over it with this weekend’s project – rubber stamps. My kid said something about wanting some new stamps and the part of me that is constantly looking for any excuse to pop over to TechShop for a few hours sprang into action. I knew that it was possible to etch custom rubber stamps with a laser cutter, but not much more than that. Less than 24 hours later I’d made a bunch of mistakes but ended up with some pretty good stamps.
Raw Materials
I had a goal and no plan, but I didn’t let that prevent me from getting started. I wandered around a local art supply store looking for things I could etch with a laser. It turns out they actually sell plain rubber sheets for hand-engraving and through some random bit of luck I walked right up to them in the store. They are exactly the color and texture of newborn hamster – pink and squishy and somehow unsettling. Then all I needed was some wood to use as a handle for the stamp. I had some scraps in the garage that I cut down to size. That plus some hot glue and I was ready to go.
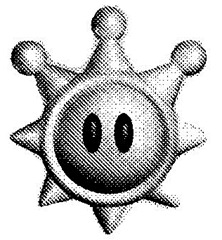
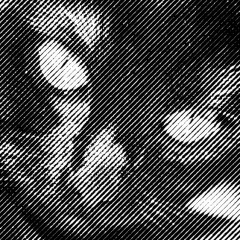
For artwork I grabbed some pictures of our cat and some Super Mario characters. Stamping with ink has the same constraint as some of my previous art projects – there is no way to modulate the intensity of the ink so you need to modulate the density of placement to get gradations of color. I should rename this to the halftone blog, since I end up using halftoning techniques for everything I do. In CorelPaint I converted the images to monochrome and used a variety of halftone methods to see what worked best. In the images below the Shine Sprite uses a dot halftone whereas the cat is using a 45-degree line halftone.
Frickin’ Laser Beams
Armed with something to burn and some suitable images I headed over bright and early (the only way to get time on a laser on short notice is to get there at 9AM) to use the 45 watt Epilog laser cutter. Inking paper with a stamp means we want to place ink where the images are dark. This is the reverse of how the laser usually works, which is to burn the material where the image is dark. For our rubber stamps we want to burn away the bits that shouldn’t pick up ink which is the white parts of the image.
The Epilog print driver has a specific setting in the Advanced tab called “Stamp Mode” which reverses this logic so white areas turn the laser on rather than black. This was just what I needed so I picked that and then went to start my etching/cutting job. Since my piece of rubber material was fairly large (around 100mm x 75mm) my job consisted of several stamps I would etch into and cut from the rubber. I added hairline vector outlines around the raster images which would cut partially through the rubber making it easy to separate the stamps.
But when I ran my job it only etched one of the stamp images and skipped all the others. Additionally it didn’t do any of the vector cutting at all. I’ve had issues like this before – setting the wrong line weight or fill/clipping options can cause a part of your document to get skipped. After wasting half an hour I was completely stumped. In desperation I turned off “Stamp Mode” in the driver and voila everything started working again. So rather than continue reverse-engineering the inscrutable logic of Stamp Mode, I just inverted my colors manually and started my job up. The vectors cut and the images etched and all was well.
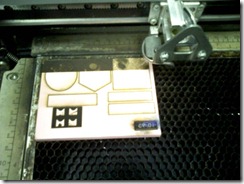
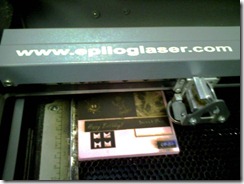
The job was about 98% done and I was admiring how nice the text stamps (Happy Birthday) were coming out when it occurred to me that there’s at least one other thing that Stamp Mode must be doing. Clearly it is also flipping the images horizontally, since what you get on the paper is a mirror image of what you see on the bottom of the stamp. So my text stamps were only useful for stamping birthday wishes on the front of cars so they could be read from another vehicle’s rear-view mirror. Another hard-won piece of knowledge gained.
The Verdict
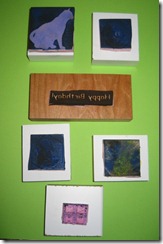 I had other stamps I wanted to etch, but at this point nearly 2 hours had gone by and as intoxicating as the fumes of burning rubber were it was time to call it a day. I cut the stamps out and affixed them to the wood blocks and did a few test runs to see how they came out.
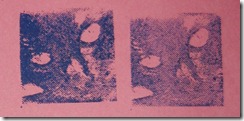 All told I’m pretty satisfied with the results. There linear halftones have the lines a bit too close together so the lines aren’t as distinct. In the future I’ll probably go with fewer lines-per-inch for the halftone. Additionally, I only ended up etching out about 1/16th of an inch or so which isn’t enough to get a really clean stamp. I had to run the laser fairly slow (~15% speed) to get that so next time I’ll probably do 2 passes to burn away a bit more material. You don’t want to go any slower than I did, because at slower speeds rather than etch deeper the rubber simply gets overly hot and starts to melt.
Although the next logical step in the progression is probably something like laser-cut doilies, I’m not sure what I’ll be doing next. I was inspired by the #awesomeaugust trend on Twitter, which is a challenge to finish 4 projects in the month of August. I made a list of projects either already partially started or band-new and I’ve got a few days of vacation, so we’ll see where inspiration strikes next.
PS: I mentioned the crocheted hand grenade guy earlier. You’ve got to check out his site at http://woowork.blogspot.com/ – everything he does is pure effin’ gold.